When I purchased my first beekeeping starter kit, I had no idea how much joy these fascinating creatures would bring to my life. My journey from nervous beginner to confident beekeeper taught me that having the right equipment from day one makes all the difference in the world.
If you’re reading this, you’re likely curious about starting your own beekeeping adventure. Maybe you’re drawn to the environmental benefits, the promise of fresh honey, or simply the meditative experience of working with bees. Whatever your motivation, I’m here to guide you through everything you need to know about beekeeping starter kits.
Why Invest in a Quality Starter Kit
I often tell beekeeping beginners that while it’s tempting to piece together equipment from various sources to save money, a comprehensive starter kit offers significant advantages for beginners.
When I began, I tried to assemble my equipment piecemeal. The result? Components that didn’t quite fit together, unnecessary duplicates, and eventually spending more than if I’d purchased a quality kit upfront. A well-designed starter kit ensures all parts work together seamlessly, which is crucial when you’re still learning the basics.
Beyond compatibility, there’s also the confidence factor. Walking up to a buzzing hive for the first time is intimidating enough without wondering if your equipment is adequate. A proper kit gives you one less thing to worry about, allowing you to focus on what matters: learning to work with your bees.
Essential Components of a Beginner Beekeeping Kit
Hive Components
The heart of any beekeeping operation is the hive itself. After trying various setups over the years, I strongly recommend the Langstroth hive for beginners. It’s the most common design in North America, which means finding equipment, replacements, and advice is straightforward.
A complete Langstroth setup includes:
Bottom Board: This serves as the hive’s floor and entrance. You’ll typically choose between solid wooden boards or screened versions. I prefer screened bottom boards in warmer climates as they improve ventilation and help with mite management. In colder regions, solid boards provide better insulation during winter.
Brood Boxes: These deep boxes house the queen and developing brood (baby bees). Most starter kits include one or two deep boxes. When I started, I found managing two deep brood boxes ideal—it gives the queen ample space to lay eggs while providing storage for the bees’ winter food supplies.
Honey Supers: These are shallower boxes placed above the brood area where bees store excess honey for you to harvest. Medium supers are typically easier for beginners to handle as they’re lighter when full of honey. I learned this lesson the hard way after throwing my back out lifting a deep super full of honey!
Frames and Foundation: Each box contains hanging frames where bees build their comb. Most kits include frames with foundation—thin sheets of beeswax or plastic embossed with hexagonal patterns that guide bees to build straight combs. When I first started, I appreciated the plastic foundations with wax coating as they were durable yet attractive to the bees.
Inner Cover: This flat cover sits directly above the top box, providing insulation and proper bee space. Some feature an oval hole for ventilation or feeding.
Outer Cover: Also called a “telescoping cover,” this protects the entire hive from the elements. I’ve found that metal-covered tops last much longer than all-wood versions, especially in rainy climates.
Hive Stand: While not always included in starter kits, elevating your hive off the ground is crucial. It improves ventilation, reduces humidity, and protects against pests. My first hive stand was simply concrete blocks, which worked perfectly well.
See More: Beginner’s Guide: How to Start a Beehive in Your Backyard
Protective Gear
I’ll never forget my first sting through improper gear—a humbling reminder of why quality protective equipment matters. Here’s what you’ll need:
Veil and Hat: At minimum, you need protection for your face and head. Options range from stand-alone veils to hat-and-veil combinations. I started with a round veil hat, which worked well, though I now prefer the improved visibility of a fencing veil style.
Bee Suit or Jacket: Full suits cover your entire body, while jackets protect your upper half (worn with long pants). As a beginner, I found a full suit provided peace of mind, though in hot summer months, I quickly upgraded to a ventilated jacket to avoid overheating.
Gloves: Beekeeping-specific gloves typically extend up the arm for protection. Leather offers excellent sting prevention but reduces dexterity. I now prefer nitrile gloves for routine inspections—they provide adequate protection with better feel for handling frames. However, when working with particularly defensive colonies, I still reach for my leather gloves.
One tip I share with all beginners: purchase protective gear that’s slightly larger than your normal size. The extra room improves air circulation and reduces the chances of stings through fabric pressed against your skin.
Hive Tools
The right tools make hive inspections smooth and efficient. After countless hive inspections, these are the essentials I wouldn’t work without:
Standard Hive Tool: This flat metal tool is used for prying apart boxes and frames that bees have glued together with propolis. I couldn’t manage a single inspection without one. The J-hook end is perfect for lifting frames, while the flat end scrapes and separates hive components.
Frame Gripper: As your confidence grows, this tool becomes invaluable for easily removing the first frame—often the trickiest part of an inspection. I resisted buying one initially, considering it unnecessary. Now I wouldn’t inspect a hive without it.
Bee Brush: A soft-bristled brush gently removes bees from frames during honey harvests or inspections. I’ve found natural horsehair brushes to be gentler on the bees than synthetic versions.
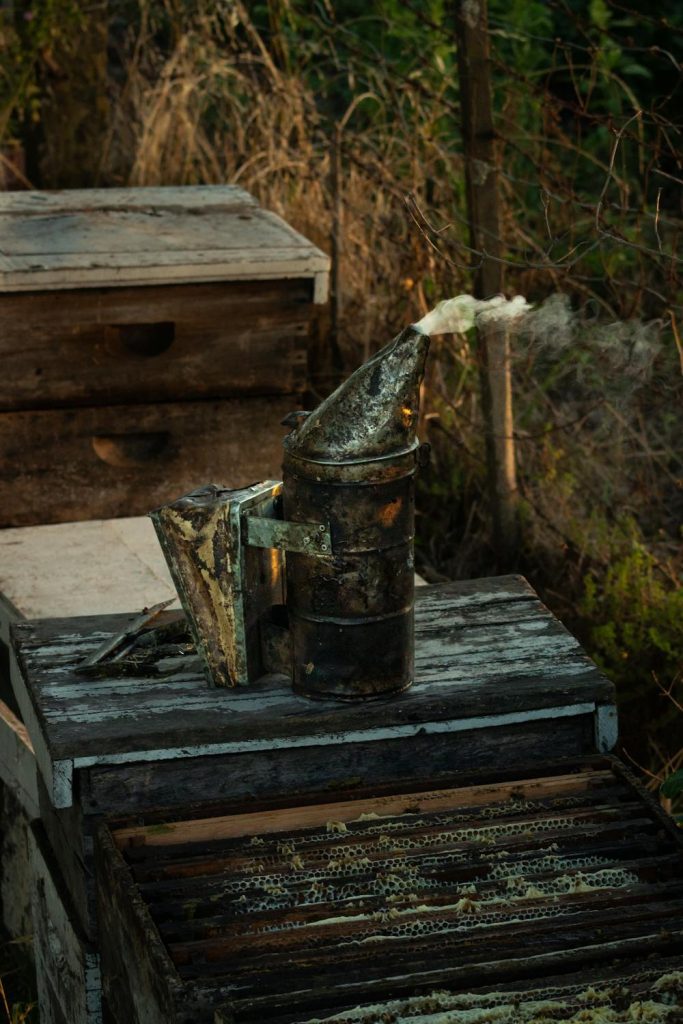
Smoker: Perhaps the most iconic beekeeping tool, a smoker produces cool smoke that calms bees during inspections. The first time I worked my bees without using a smoker taught me just how essential this tool is! Look for one with a heat shield and a good-sized bellows. My personal preference is for the 4×7 inch size, which holds enough fuel for extended inspections.
Smoker Fuel: You’ll need material to burn in your smoker. Commercial fuels work well, but I’ve had great success with free alternatives like dried pine needles, clean burlap, or cardboard egg cartons. Experiment to find what works best for you and your local conditions.
Honey Harvesting Basics
While you won’t harvest honey immediately, most good starter kits include basic extraction tools:
Uncapping Tool: Whether a specialized knife, fork, or scratcher, you’ll need something to remove the wax cappings from honey frames. I started with an uncapping fork and still find it perfectly adequate for small-scale operations.
Honey Strainer and Food-Grade Bucket: After extraction, honey needs straining to remove wax bits and other debris. A simple stainless steel double-sieve over a food-grade bucket works beautifully. My first setup was exactly this, and I still use the same system for small batches.
Basic Extractor: While not typically included in starter kits due to cost, you’ll eventually need a way to extract honey from frames. For your first season, consider joining a local beekeeping association where you can often rent extraction equipment. That’s what I did for my first two seasons before investing in my own two-frame tangential extractor.
Optional but Helpful Additions
While not strictly essential, these items can make your beekeeping journey easier and more productive:
Frame Feeders: These replace a frame in the hive and hold sugar syrup for feeding during nectar dearths or colony establishment. I’ve found division board feeders particularly useful for new packages, though they require careful placement to prevent bee drowning.
Entrance Reducers: These wooden or plastic devices narrow the hive entrance, helping weak or new colonies defend against robbing and pests. During my first spring, an entrance reducer saved one of my colonies from a robbing attack that could have decimated them.
Queen Excluders: Placed between brood boxes and honey supers, these prevent the queen from laying eggs in honey storage areas. Whether to use these is somewhat controversial among beekeepers. I personally use them selectively depending on the season and colony strength.
Hive Monitoring Tools: From simple temperature strips to sophisticated digital monitors, these help track conditions inside your hive without disturbance. I started with basic tools and gradually added technology as my apiary grew.
Medications and Treatments: While not needed immediately, having mite treatments on hand is increasingly important for bee health. I recommend researching integrated pest management (IPM) approaches before your bees arrive.

Comparing Popular Starter Kits
Budget Options ($200-300 Range)
At this price point, expect basic functionality without extras. Typically, these kits include:
- One brood box with frames and foundation
- Basic protective gear (usually just a veil)
- Standard hive tool
- Simple smoker
When I recommend budget kits, I advise being prepared to make additional purchases within the first season, particularly a second brood box and more protective equipment.
Mid-Range Kits ($300-500 Range)
This is the sweet spot for most beginners, offering better quality and more complete setups:
- Two brood boxes with frames and foundation
- One honey super
- Complete protective gear (jacket or suit)
- Better quality tools
- Basic extraction equipment
My first kit was in this range, and it served me well for several seasons before needing upgrades.
Premium Setups ($500+)
These high-end kits typically feature:
- Multiple boxes with premium frames and foundation
- Ventilated protective gear
- Comprehensive tool sets
- Advanced hive designs or features
- Superior craftsmanship and materials
If beekeeping is more than a casual interest, the investment in a premium kit often pays off in longevity and performance.
What to Look for in Quality
Regardless of price, evaluate kits based on:
Wood Quality: Pine is standard, but cedar or cypress offers better durability. Check for knots or splits that might create unwanted openings in the hive.
Joinery: Finger-jointed corners provide better durability and water resistance than simple butt joints.
Foundation Type: Plastic foundations last longer but may be less readily accepted by bees. Wax foundations are more natural but require careful handling.
Hardware: Stainless steel or brass hardware resists corrosion better than standard steel.
After inspecting countless hives, I’ve found that those built with quality materials typically last 15+ years with basic maintenance, while budget equipment often needs replacement within 5-7 years.
When to Buy and Set Up Your Beekeeping Starter Kit
Timing matters in beekeeping. I suggest purchasing your equipment at least 1-2 months before you expect to receive your bees. This allows time for:
Assembly: Most kits require some assembly, from simple nail-and-glue operations to complete construction from components. My first kit took a full weekend to assemble and paint properly.
Painting: Exterior hive surfaces benefit from weather protection. I recommend white or light colors in hot climates to reflect heat; darker colors work better in cool regions. Use quality exterior latex paint and allow 2-3 weeks of drying/airing out before introducing bees.
Placement Planning: Take time to select and prepare your apiary site. I consider sun exposure (morning sun is beneficial), wind protection, water sources, and accessibility.
For those in North America, ordering equipment by January or February positions you perfectly for April-May colony installation.
Where to Purchase Your First Bees
With your equipment ready, it’s time to source your bees. Options include:
Package Bees: About 3 pounds of worker bees with a separately caged queen. These are the most common starter option and what I began with. Packages typically take longer to build up than nucleus colonies but are usually less expensive.
Nucleus Colony (“Nuc”): A small established colony with a laying queen, workers, brood, and honey stores on 3-5 frames. In my experience, nucs provide a head start on the season but cost more initially.
Local vs. Mail Order: I strongly recommend purchasing bees from local suppliers when possible. Local bees are often better adapted to your climate and arrive in better condition than shipped packages. Plus, local suppliers can become valuable mentors.
When ordering bees, I suggest placing your order by January for spring delivery. Ask potential suppliers these questions:
- What bee stock/breed do you offer? (Italian, Carniolan, etc.)
- Are your queens marked or clipped?
- What is your replacement policy if the queen fails?
- Have the bees been treated for mites, and if so, with what?
- Are health certificates provided for shipped bees?
My first package consisted of Minnesota Hygienic Italians—a gentle, productive strain that served as excellent “beginner bees” while I learned the basics.
Maintenance and Growth Considerations
As your beekeeping journey progresses, anticipate these additional needs:
Year One Additions: Most beginners find they need extra honey supers by mid-season if conditions are favorable. I recommend having at least 2-3 extra supers ready, even if you don’t use them the first year.
Storage: Beekeeping equipment requires proper off-season storage to prevent damage from wax moths, rodents, and moisture. I store unused equipment in sealed plastic bags with paradichlorobenzene crystals to prevent wax moth damage.
Cleaning and Maintenance: Establish regular cleaning routines for tools and equipment. I scrape and clean my hive tools after each use and perform thorough smoker maintenance monthly during active seasons.
Record Keeping: While not equipment per se, a dedicated beekeeping journal or app to track inspections, treatments, and observations proves invaluable. Looking back at my first years’ notes has helped me avoid repeating early mistakes.
Conclusion: Beekeeping Starter Kits: What Every Beginner Needs to Get Started
Starting beekeeping reminds me of learning to swim—having the right equipment won’t instantly make you an expert, but it creates the conditions for success. A quality starter kit provides the foundation upon which your knowledge and confidence can grow.
I strongly encourage all new beekeepers to complement their equipment purchase with education. Join local beekeeping associations, take workshops, find mentors, and read widely. The combination of proper tools and knowledge will serve you far better than either alone.
Remember that beekeeping is both an ancient practice and a continually evolving science. Be prepared to adapt your methods and possibly your equipment as you learn more about your bees’ specific needs in your local environment. With the right start, I’m confident you’ll discover the same joy and satisfaction in this remarkable pursuit.
Have questions about starting your beekeeping journey? Drop them in the comments below, and I’ll do my best to help you get started on the right foot!


Leave a Reply